A Guide To Setting Up A PA System for Bands and DJs
So you're starting out and have bought all the equipment you need (or thought you needed!). How do you go about making it all work together?!
Setting up a PA system might seem daunting at first glance, but with a step-by-step guide, you'll find it's quite manageable, even if you're new to the world of PA equipment. This guide breaks it down into straightforward steps so you can set up your PA system with confidence, whether it's for a small gig, a large event, or a personal project.
Keeping things as simple as possible, we will only be looking here at point-source PA speakers designed for front-of-house applications, as these are by far the most common speakers for both live bands and professional mobile DJs. There are obviously other PA systems available, from compact line array systems to column speaker setups, but it's extremely unusual for local-level musicians and DJs to invest the sort of funds those types of systems run to.
UNDERSTANDING YOUR PA COMPONENTS
Firstly, let's have a little checklist moment for everyone and clarify what you should typically find in a PA system:
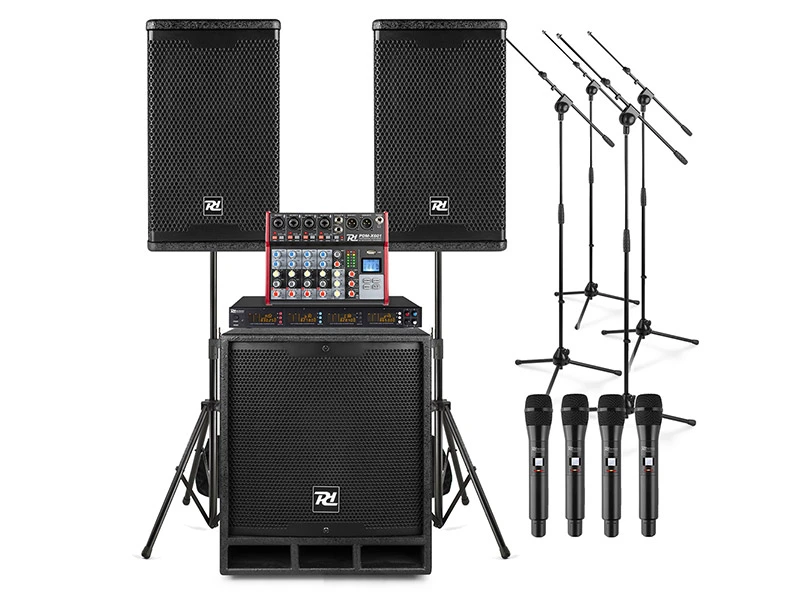
Main Speakers: You will of course have a set of main speakers (for the audience) and these will very likely be Active speakers(powered), which is most popular for both value and convenience. For a live band, it’s generally considered that a 12-inch speaker set provides the best response for vocals, while a DJ should really be looking at 15-inch speakers as they deal much better with the fast pace of loud dance music.
Monitor Speakers: Wedge monitors, floor monitors, foldback monitors. They go by several names, but their task is the same, which is to provide the performer (singer, musician, or DJ) with a direct feed of the output. This helps keep you in time and avoid hearing the delayed room acoustics coming back from the main speakers. Again, these will generally be active units these days for convenience and the ability to quickly adjust each one to suit the user.
Subwoofers: Though not a total necessity, the addition of one or two subwoofers to reinforce the low end is a great enhancement for a band, especially if you are taking the bass guitar and drums through the main PA as it really takes the strain off your main speakers. For DJs, it’s certainly a good idea, especially for those playing larger venues or bass-heavy dance music.
Amplifier: Only required if you have gone with more traditional Passive speakers, you will need a suitably powerful power amplifier, possibly several if you are running passive monitor speakers and subs. Depending on the speakers, you may also need an electronic crossover or speaker management system.
Mixing Desk (Mixer): The heart of your PA system, a mixer allows you to blend and balance multiple audio sources. For band use, the mixer will need to have enough microphone inputs and channels to cater for the vocal mics along with any instrument microphones or line-level feeds. It will also have monitor or booth outputs for easy connection of monitor speakers. For a DJ, the need for a mixer is purely dependent on the format being used, as those using a laptop and DJ controller won't need one, but an older rig for CDs or vinyl will do.
Microphones: Microphones for your vocalists are a given, and should be the best quality you can budget for. These will be dynamic mics (you don't want a condenser mic for a live stage). You then may or may not have instrument microphones, drum mics etc, and this will vary with the size of the band and the type of gigs they are doing. (events bands tend to fully mic up, whereas many pub bands don't). Microphones can be a wired connection or you may wish to use a wireless mic setup
Cables: Good quality cables are a must. You will need balanced microphone cables, instrument cables, signal cables for active speakers, speaker cables for passive speakers, power cables for everything, and an adequate amount of power extension leads. Ideally, you will have at least 1 spare of everything in case of an issue.
Stands: You will have microphone stands for the main vocalists, speaker stands for the main PA, or speaker poles if you mount them to subwoofers.


POSITIONING AND CONNECTING THE SPEAKERS
Hugely important to get the best sound and coverage in any room or space, your speaker system can't perform miracles, so needs to be in the best location possible to do its job with as little compromise as possible.
Main Speakers: Ideally place them on either side of the stage or performance area to ensure even sound distribution. The height should be such that the speakers are head level or above to minimise sound absorption by the crowd. To avoid unwanted feedback, they should be placed further forward than any of your microphones.
Monitor Speakers: Positioned on stage facing the performers, usually on the floor facing up. This allows the artists to hear themselves and other band members clearly, which is crucial for timing and level monitoring during a performance. For DJs, the monitor will usually be a smaller speaker and ideally be close to head height in your booth or on a stand.
Subwoofers: You may have read before that subs can go anywhere as bass isn't directional. Now while this is technically true, subs for a band or mobile DJ will generally be low-end and even midrange reinforcement rather than actually producing any real sub-bass, so really should be located as close the the main speakers as possible, facing the same output direction, as they are more an extension of the top speaker in this particular situation. This helps greatly with the cohesion of sound, and most subs include a pole mount to allow the direct mounting of top speakers.
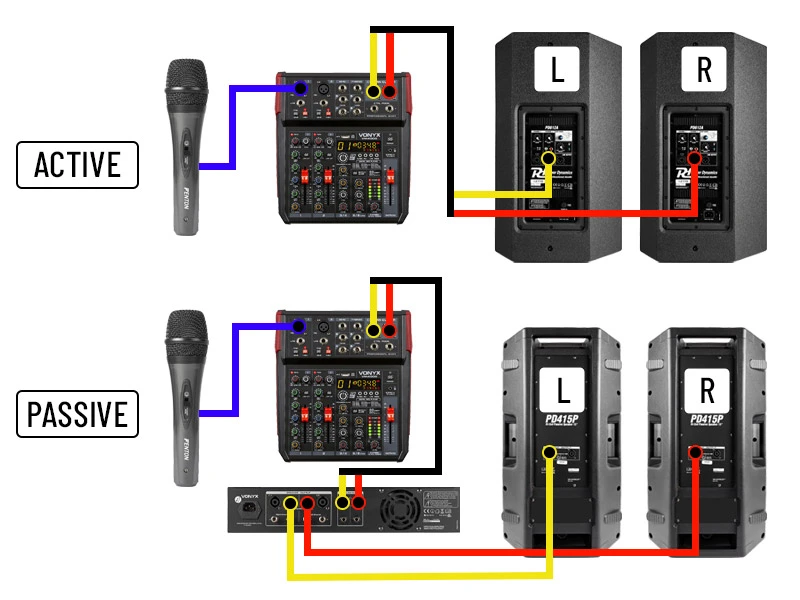
Active Connection: Connect the speaker's line input directly to the mixer's main output using either XLR cables, 6.35mm(¼ inch) cables, or RCA cables depending on your equipment’s connectors. When using subwoofers in a standard setup, your mixer output will go to the subwoofer line input first, and then the sub's output is taken, using another cable, to the main speaker's line input. This allows the subwoofer's crossover to control what frequencies are passed.
Passive Connection: Connect the speakers to the amplifier using as heavy-duty speaker cables as possible, with the connection options usually being bare wire, 6.35mm(¼”) jack, or Speakon plugs on higher performance systems. then connect the amplifier's line input to the mixer's main output using the best connection method available (XLR preferred, but RCA is fine).


MICROPHONE AND INSTRUMENT SETUP
Space is always going to be your biggest issue, whether its a stage or a section of floor. With most bands being 4 or 5 people, then your sound system, then instruments. It can be a challenge to get a good position for everyone.
Microphones: Place vocal mics on stands so they are at a comfortable height, and ideally where they won't be in constant danger of being knocked over. Instrument mics (usually drums, or a guitar cabinet) will usually be clamped in place.
Direct Inputs: Keyboards or electronic instruments such as guitars that are going straight into the desk will require their low-level signal to be boosted with the use of a direct injection box (DI box) ensuring a cleaner sound by matching the mixer’s input impedance and balancing the signal to remove noise.
Multi-Effects: A common method these days for both bass and electric guitar is to go into a digital effects system first. This will take care of the signal preamplification, providing a line-level output that can go straight into your mixer. These units also offer the benefit to the user of amp and cabinet emulation and of course effects, allowing your guitar to sound like it came from a real guitar amp when played via the PA.


CONNECTING THE MIXER
Position your mixer in a location that's easily accessible to allow adjustment through the gig when needed. Though they can look intimidating, a PA mixer is actually very simple, with a channel having an input for a signal, and controls for adjusting its level and tone. This format is then just repeated multiple times, all separate from each other yet wired to a common output.
Input Channels: Microphones, musical instruments and other sound sources connect to the mixer's input channels. The best connection for signals is XLR as its balanced design removes unwanted noise.
Gain: This is to adjust the sensitivity of the input, as some mics, for instance, produce a hotter signal than others, and each performers natural volume then adds their own vocal gain. This will need to be dialled in to give each input a clean and uniform signal that's free from distortion. Gain IS NOT volume! Be very careful with gain, as it can destroy your speakers and its misuse is a huge reason why many bands and DJs sound awful and don't know why.
EQ: This is your tone control, so bass, midrange and treble adjustment, again to alter each input signal to suit the sound you want and to balance out any overbearing or underwhelming variations. Again you are aiming for clean, clear and balanced, so don't get carried away, as these also increase gain. Some mixers feature DSP processing, which will offer a range of presets and effects to alter the EQ further.
Channel Volume: After getting your signal to sound nice using the gain and EQ, you then use the channel volume to set the overall output level for that channel, and all the other channels so they are as balanced with each other as possible.
Main Volume: The master volume adjusts the output of the mixer as a whole. Most mixers have visual indication of output level (VU meter) and this is a great way to keep the mixer output at a clean level when adjusting the volume of your speakers.


Read More...
5 SOUND CHECK AND BALANCING
Ok, so everything is plugged in and switched on? good stuff. You know how to adjust gain, EQ, and channel volume for everything coming into the mixer. Now we will go over bringing up the system to a usable volume level, both the main speakers and any monitoring, keeping an ear out for unwanted feedback and paying attention to some basic setup and stage layout safety tips.
Though your setup process will always be the same, the venues you play will change in physical size and acoustic response depending on allsorts of factors. The difference in natural reverb between a carpet floor and wood floor for example will need to be adjusted out with EQ and volume to avoid any unwanted booming.
Overall Volume: Ideally done with someone on stage and a listener at the back of the venue. Regardless of an active or passive speaker system, it's a good idea to start with amplifiers at approximately 50% volume, then bring the master volume on the mixer up gradually, aiming for as close to zero on the VU meter as possible (unity gain). If this is not loud enough, you increase the amplifier volume and re-adjust the mixer to suit until you hit the level you want for the room. This can always be done with a pre-recorded music source to get things near enough. The best way to think of it is as a see-saw or set of scales. It's all about balance. Your main volume is just for the audience, where the channel volumes are so you are all at the same level to each other.
Vocal Checks: Start with the lead vocal, asking the performer to sing or speak into the microphone while you adjust the channel gain, EQ, and volume to ensure clarity and presence. Some mixers will also include adjustable compression which helps get a more uniform signal from vocals by smoothing the highs and lows, so this can be included as part of the tone-shaping steps.
Instruments: Move on to instruments, adjusting levels to create a balanced mix where each element can be distinctly heard. Instruments can differ wildly in output, and when it comes to things like a fully microphoned drumkit, it is common for the drummer to have their own small mixer for this, with a master output being sent to the main desk. Be aware that a kick drum or low B of a 5-string bass can make your main speakers very unhappy very quickly if too loud in the mix, which is especially important if you aren't using a subwoofer and only top speakers.
6 MONITORING AND FEEDBACK CONTROL
If you're using monitors, connect them to the appropriate outputs on your mixer and position them facing the performers. To control any feedback, avoid pointing microphones directly at speakers or monitors, and use EQ settings to notch out frequencies that cause feedback. This is much easier when each monitor is active as the speaker has its own level controls so can be adjusted by the performer it's affecting rather than from the desk.
Separate Mixes: If possible, it's better to create isolated mixes for each monitor (or group of monitors) to cater to the individual needs of the performers. If that’s not possible with your particular mixer, the monitor feed can just be wired as daisy chain from the mixer's monitor output, so all monitors are playing back the full mix.
Communication is Key: Work with the performers during soundcheck to adjust their monitor mixes, ensuring they are comfortable with what they hear on stage. There is nothing more frustrating than not being able to hear yourself.
7 SAFETY AND CABLE MANAGEMENT
Speakers: Depending on the space available at the venue, speaker placement can often be less than ideal, and you may not have the luxury of a raised stage area to separate you and your equipment from the audience. Ensure that stand-mounted speakers have as solid footing as possible to limit the possibility of being toppled over.
Audio Cables: Ensure cables are neatly arranged and secured to prevent tripping hazards. Use gaffer tape to secure cables to the floor and keep the stage area safe. Tripping on a mic cable and landing into the drum kit may look rock and roll, but it's a quick way to injury and to never being asked back again.
Power Cables: Don't overload power sockets, and never power an extension lead from another extension lead, as you are risking a fire. And use decent-quality power extensions not something from the local pound shop. A poor mains supply can and will introduce noise and hum to your audio, with motors and compressors (smoke machines, pub fridges etc) being the worst culprits, so always try to avoid daisy-chains, and keep the speakers or amplifier power feeds isolated when possible.
8 FINAL THOUGHTS
The goal of setting up a PA system is not only to amplify sound but to enhance the overall performance by ensuring every note and word is clearly heard and felt by the audience. Taking the time to properly set up and soundcheck can make a significant difference in the quality of live performances.
Get to know your equipment before taking it out for paid work. Play with the controls, and understand what they do. It sounds silly, but so many bands and DJs just wing it and hope for the best, which is just terrible and so unnecessary. Always allow for enough setup time before the event and be prepared to make adjustments as needed during the performance without becoming panicked. Trust the process.


